Anti-siphon valve leaking from the cap? Learn the 5 causes, how to diagnose the problem, and step-by-step fixes for a clogged poppet or cracked valve body.
⏱ 11 min read · Last updated October 2026
Ken Kwiatkowski
Founder of GRASSHOLE Corporation & inventor of the Sprinkler-Guard
Veteran. Florida homeowner who got tired of replacing the same broken sprinkler heads every season. Featured by Kevin Harrington (from Shark Tank). Recipient of the JMI 30 Award. Manufactures in Bradenton, Florida.
Full disclosure: GRASSHOLE Corporation manufactures the Sprinkler-Guard discussed in this guide. Our recommendations come from years of field testing and customer feedback.
Table of Contents
An anti-siphon valve leaks from the top cap for three main reasons: debris caught under the poppet seat, a worn or cracked poppet, or a cracked valve body from a freeze. A brief drip right after the zone shuts off is normal. Continuous spray during the zone is the problem you need to fix.
You turn on a zone and notice water dribbling — or outright spraying — from the top of that above-ground valve body on the wall or riser. Not from the heads out in the yard. From the valve itself.
That’s your anti-siphon valve, and it’s trying to tell you something.
Most anti-siphon leaks are a quick DIY fix. You just need to know where to look first.
The 5 Most Common Reasons an Anti-Siphon Valve Leaks
Anti-siphon valves have a small air vent on top — called the poppet assembly — that lets air into the line when the zone shuts down. That air break is exactly what stops irrigation water from flowing back into your home’s drinking water. So a tiny drip for a few seconds right as a zone turns off? Normal. That’s the poppet doing its job.
When water leaks continuously during zone operation, or keeps dripping long after the system has shut off, that’s the problem.
1. Debris Under the Poppet Seat
Dirt, sand, and mineral buildup can wedge under the rubber poppet and hold it slightly open. Water pressure pushes through that gap and out the vent cap during the run. This is the most common cause, and also the easiest to fix — you clean it out.
2. Worn or Cracked Poppet
The rubber poppet ages like any other gasket. Sun exposure degrades it (these valves sit above ground), and repeated pressure cycling wears the seat over time. When the rubber gets stiff or cracked, it can’t seal properly, and water finds a way through.
3. Cracked Valve Body from Freezing
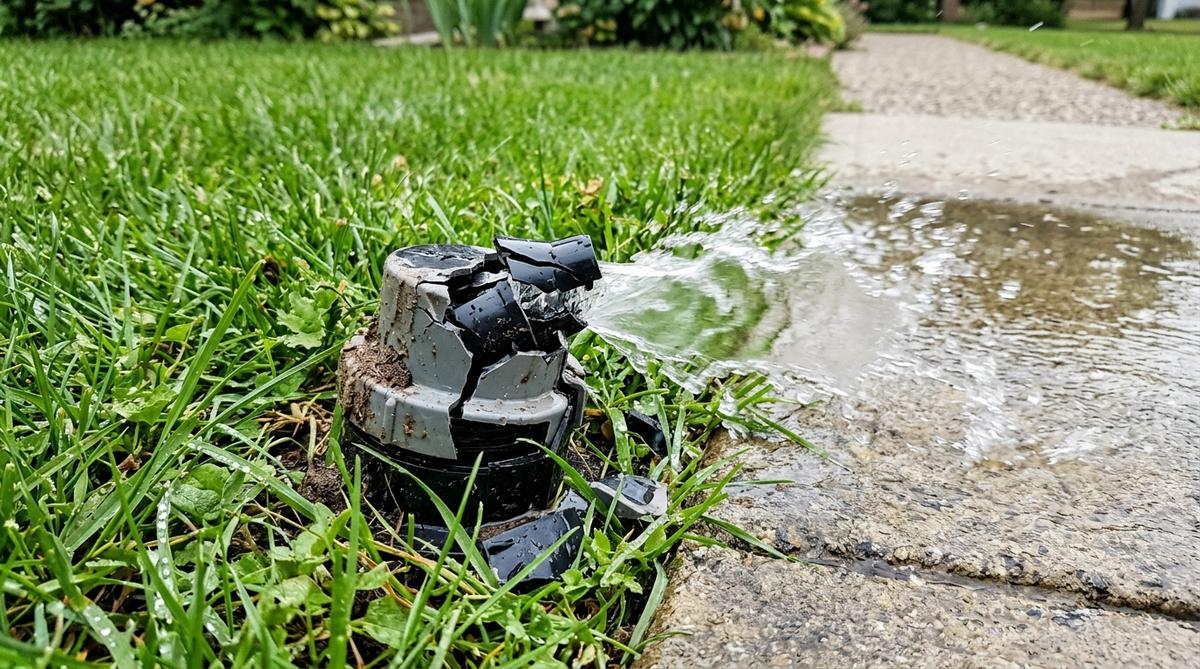
Trapped water in the valve expands during a hard freeze and cracks the plastic body. You’ll usually see a hairline crack near the cap or along the side. No amount of cleaning fixes this one — the valve needs to come out.
4. Over-Tightened or Cross-Threaded Cap
If someone cranked the top cap down too hard during a previous repair, the threads can strip or the cap can crack. Same result from cross-threading it. The seal is compromised and water wicks out around the threads.
5. Failed Diaphragm Inside the Valve Body
Most anti-siphon valves have a rubber diaphragm that controls flow. When it tears or stiffens, the valve can both leak externally and fail to shut off fully. You’ll often notice that zone runs long after the controller says to stop — the valve isn’t closing cleanly.
How to Diagnose Which Cause You Have
Before pulling the valve apart, watch it for a minute. Where exactly is water coming out?
Water from the top vent cap during zone operation: Start with the poppet — debris or wear is the likely cause.
Water drips from the top cap right after shutdown, for 5 to 30 seconds: This is normal anti-siphon function. That brief drip is the vent doing its job. No action needed.
Water drips from the top cap continuously, even when no zone is running: The poppet is stuck open or the diaphragm has failed. The valve may not be fully closing — watch the zone cycle to check.
Water appears from the side of the valve body or around the union: Cracked body, stripped threads, or a failed union O-ring. This one usually needs a new valve.
The zone runs longer than it should AND the cap leaks: Diaphragm failure. The poppet fix won’t solve it — you need to rebuild the valve internals or replace the whole unit.
Water leaking from the side of the valve body usually means the freeze already did its damage. If you’re looking at a crack in the plastic body itself, replacement is the right call. A new anti-siphon valve runs $3 to $30 in parts at any hardware store, per LawnStarter.
For a leak coming from deeper inside a valve box rather than the above-ground body, that’s a different repair — see our guide on sprinkler valve leaking for in-ground solenoid valve issues. If the leak is coming from a separate backflow device, our backflow preventer leaking guide covers that instead.
How to Fix a Clogged or Worn Poppet
Total time needed: about 10 minutes.
- Step 1: Turn Off the Zone and Relieve Pressure
Run your irrigation controller through a manual cycle for that zone, then shut it off. Let the system drain for a few minutes so there's no water pressure in the line before you open the valve.
- Step 2: Unscrew the Cap from the Valve Body
Turn the cap counterclockwise. Most unscrew by hand; some need channel-lock pliers with a rag to protect the plastic. If it won't budge, soak the threads with penetrating oil for 10 minutes first and try again.
- Step 3: Lift Out the Poppet Assembly
The poppet sits right under the cap — it's a small plastic disc with a rubber gasket on the bottom. Lift it straight up. If it sticks, run a flat screwdriver gently under the edge to break the seal.
- Step 4: Inspect and Clean the Seat
Look at the poppet gasket and the flat seat inside the valve where it rests. You're looking for grit or mineral deposits (white calcium buildup) on the seat, and cracks or hardening in the rubber gasket. If the seat has debris, wipe it clean with a damp cloth. If the gasket looks cracked or hardened, replace the whole poppet assembly — they're available at any irrigation supply or hardware store for a few dollars.
- Step 5: Reinstall and Test
Thread the poppet back into the seat by hand, making sure it sits flat. Screw the cap back down — firm but not cranked tight. Turn the zone on. Watch the cap for 30 seconds. A brief drip during shutdown is fine. Continuous spray means the seat still has debris, or the replacement poppet needs to seat more fully — check the cap thread engagement and try again.
How to Replace the Entire Anti-Siphon Valve
Total time needed: about 10 minutes.
- Step 1: Shut Off the Main Irrigation Water Supply
Find the isolation valve for your irrigation system — usually in the garage, utility closet, or near the main backflow device. Turn it off, then open a zone manually to drain the pressure from the lines.
- Step 2: Unscrew the Anti-Siphon Valve from the Riser
Turn the entire valve body counterclockwise. It may be hand-tight or may need pipe pliers. If it's been in place for years, apply penetrating oil at the base where the valve threads onto the riser, wait 10 minutes, then try again.
- Step 3: Match the Size Before You Buy a Replacement
Anti-siphon valves come in different sizes — 3/4" and 1" are most common in residential systems. Bring the old valve to the hardware store and match the thread size. The replacement should be rated for your system's flow and pressure.
- Step 4: Wrap the Riser Threads with Teflon Tape
Three wraps of Teflon tape on the male threads of the riser, applied clockwise. This prevents the new valve from leaking at the connection point.
- Step 5: Thread On the New Valve and Test
Hand-tighten first, then snug it another quarter turn with pliers. Restore water supply slowly. Check the base connection for drips. Run the zone and watch the cap — if it's quiet during operation and only drips briefly at shutdown, the repair is complete.
When to Call a Pro
Most anti-siphon valve leaks are a straightforward DIY repair. Here’s when you hand it off instead:
The leak is at the main connection underground. If water is coming from where the valve connects to the in-ground irrigation pipe below the riser, you may have a cracked fitting or damaged pipe. That’s excavation work.
You’re not sure if the device is an anti-siphon valve or a dedicated backflow preventer. Anti-siphon valves are straightforward to replace. Reduced-pressure zone (RPZ) backflow preventers and double-check assemblies require licensed testing in many states — don’t swap those out without knowing what you have.
The valve is PVC-cemented in rather than threaded. If it was glued in place, replacement requires cutting pipe and re-gluing. Still DIY-possible if you’re comfortable with PVC cement, but harder to reverse if you make a mistake.
You’re replacing more than two or three valves at once. That’s a system problem, not a valve problem. An irrigation tech can identify the root cause — usually water hammer or chronic overpressure — before you’ve gone through every valve on the property.
Professional sprinkler system service calls typically run $130 to $360 depending on the work and your area, per LawnStarter and Angi. A single anti-siphon valve repair is usually on the lower end of that range.
How to Prevent Anti-Siphon Valve Leaks
Once the immediate problem is fixed, here’s how you keep it from coming back.
Winterize before the first freeze. The number-one cause of cracked anti-siphon valve bodies is an unexpected hard freeze on a system that still had water in it. Blow out the lines or drain the system before any night that dips below 32°F. Wrap above-ground valve bodies with foam pipe insulation as extra insurance.
Don’t over-tighten the cap. It’s a natural instinct — crank it tighter to stop the leak. With plastic valve caps, over-tightening cracks the cap or strips the threads and creates the next leak. Firm hand-tight is the right stop.
Walk the valves at the start of each season. Before you run your first zone in spring, check each valve location for any drips. Catching a poppet issue early — before it’s been seeping for two months — keeps the repair simple.
Keep a spare poppet assembly in the garage. They’re inexpensive and the part most likely to need replacing. Having one on hand means you fix it the day you find the problem.
While you’re thinking about system maintenance, your heads are worth protecting too. Mower and trimmer damage is one of the most common ways heads get cracked or knocked out of alignment between service calls. A Sprinkler-Guard fits around each head in about 30 seconds and puts a flexible buffer between the head and the blade — one less repair in the queue.
Frequently Asked Questions
Yes, briefly. A small drip for a few seconds up to about 30 seconds after the zone turns off is the anti-siphon vent working correctly — it's allowing air into the line to break any potential back-siphon into the water supply. If the dripping continues for several minutes, or happens while the zone is actively running, that's a sign the poppet needs cleaning or replacement.
Check where the water comes from. If it leaks only from the top vent cap and the valve body looks intact with no visible cracks, start with the poppet — it's a quick fix. If you see a crack in the plastic body, water seeping from the side, or the zone won't shut off at all, replace the whole valve. Parts run $3 to $30 at most hardware stores, per LawnStarter.
Yes, in most cases. Anti-siphon valves thread onto a riser, so replacement is an unscrew-and-replace job. You don't need to cut pipe or work with PVC cement. Shut off the irrigation water supply first, match the thread size on your replacement valve, wrap the riser threads with Teflon tape, and thread the new valve in snug. Most homeowners finish the job in under 30 minutes.
Each valve serves one zone. If it leaks only when that zone fires, the problem is isolated to that single valve — likely a worn poppet that can't hold against the flow from that particular zone. The other zones' valves are separate units. Fix the leaking valve; don't assume the others have the same issue unless you see evidence.
Function and location. An anti-siphon valve combines a zone shutoff valve with basic backflow prevention in one above-ground unit — it protects against low-hazard backflow by venting to atmosphere when pressure drops. A dedicated backflow preventer like a reduced-pressure zone (RPZ) or double-check valve assembly is a separate device installed at the meter or main supply line and handles higher-hazard situations. If you have both types on your system, the dedicated backflow preventer is typically the legally required device; the anti-siphon valves serve individual zones. For issues with that device, see our backflow preventer leaking guide.
DIY parts run $3 to $30 depending on whether you're replacing just the poppet or the whole valve, per LawnStarter. If you hire a pro, a service call for sprinkler system repairs typically runs $130 to $360 depending on the scope, per LawnStarter and Angi. An anti-siphon valve repair is usually one of the simpler fixes on a service call.
Yes — it's one of the most common causes of cracked valve bodies. Water expands when it freezes, and the plastic body of an anti-siphon valve doesn't flex enough to accommodate that expansion. Even a brief hard freeze on an unwinterized system can crack the body clean through. The fix is full replacement — cracks don't seal cleanly. Prevent it by draining or blowing out the system before freezing temperatures and wrapping exposed above-ground valves with pipe insulation. If this is your first irrigation repair and you're not sure whether what you're seeing is an anti-siphon valve issue or an in-ground solenoid problem, the sprinkler valve leaking guide covers the in-ground valve issues that can look similar from a distance.
Not sure? The Sprinkler-Guard ships in 10/20/30/60-packs. If one ever takes too much abuse, you swap just that one in 30 seconds — no full system to replace.
Shop Sprinkler-Guard
- Starting at $64.99 for a 10-pack
- Free shipping on orders over $100
- 500+ five-star ratings from homeowners on Amazon
- Made in the USA by a Veteran-Owned Business in Bradenton, Florida
- Patented design — featured by Kevin Harrington (from Shark Tank)
- No tools required — installs in 30 seconds per head
- One-by-one swap design — if a guard takes too much abuse, swap just that one
Last updated: October 2026. Statistics sourced from EPA WaterSense, Johns Hopkins Medicine, LawnStarter, LawnLove, HomeGuide, IBISWorld. Product specifications and pricing current as of publication date.