

How to Adjust Sprinkler Heads for Better Coverage

How to Adjust Sprinkler Heads for Better Coverage
You’ve probably noticed it. One corner of the lawn is lush and green. Another corner is brown and crispy. The grass right next to the driveway looks like it’s been on vacation in the desert. And somehow your sidewalk is getting watered better than half your yard.
Bad sprinkler coverage is one of the most common reasons lawns look uneven, and it’s almost always fixable in about thirty minutes with a screwdriver and some patience. No new equipment. No service call. No replacement parts. Just adjustment.
Here’s how to dial in your sprinkler heads so every square foot of your lawn gets the water it needs.
Why Coverage Matters More Than You Think
Most homeowners assume that if their sprinklers are running, the lawn is getting watered. But there’s a huge difference between “getting watered” and “getting watered correctly.”
A properly adjusted sprinkler system delivers what irrigation pros call “head-to-head coverage.” That means the spray from one head reaches the next head over, so every blade of grass is getting hit by water from at least two different angles. Anything less and you end up with dry spots, hot spots, and patches of grass that struggle no matter how long you run the system.
When coverage is off, your first instinct is usually to run the sprinklers longer. That doesn’t fix the problem. It just over-waters the areas that are already getting plenty and still leaves the dry spots dry. You waste water, pay a higher bill, and the lawn looks the same.
The fix is adjustment, not duration.
Tools You’ll Need
You probably have all of this already.
- A flathead screwdriver (small)
- A pair of needle-nose pliers (sometimes)
- A garden hose or way to manually run each zone
- About thirty minutes
- An afternoon when you can be in the yard while the sprinklers run
Some sprinkler heads also have a special adjustment key that comes with them, but the screwdriver works on every brand we’ve ever seen.
Step 1: Watch the System Run
Before you adjust anything, you need to see what’s actually happening. Turn on each zone one at a time and walk the lawn while it runs. Don’t try to fix things yet. Just observe.
Things to look for:
- Heads that aren’t popping up fully
- Heads spraying onto driveways, sidewalks, or the side of the house
- Areas where two sprays should overlap but don’t
- Heads spraying past where they should and watering the neighbor’s yard
- Heads with weak or dribbling pressure
- Spray patterns that are obviously wrong (full circle when it should be half, etc.)
Make a quick mental list or jot it down on your phone. Then shut the zone off and start adjusting.
Step 2: Adjust the Spray Distance
Most pop-up spray heads have a small screw on top, right in the center of the nozzle. That’s the radius adjustment. Turning it clockwise reduces the spray distance. Turning it counterclockwise increases it.
The trick is to make small adjustments and test. A quarter turn can change the throw distance by a foot or two. Don’t crank the screw all the way down or all the way up. Adjust, run the zone for thirty seconds, watch what happens, adjust again.
If a head is spraying water onto the driveway, turn the screw clockwise to pull the spray back. If it’s leaving a dry strip between itself and the next head, turn the screw counterclockwise to push the spray farther.
For rotor heads (the kind that slowly rotate back and forth), the radius adjustment screw is usually in a different spot. Hunter rotors have it on top of the head. Rain Bird rotors usually have it on the side. Check your specific brand if you can’t find it.
Step 3: Adjust the Spray Arc
This is the part that controls how much of a circle the head sprays. A head can spray anywhere from a tiny narrow slice to a full 360-degree circle. If your head is supposed to cover a quarter circle (like a corner of the lawn) but it’s currently spraying a full circle, half your water is going where it doesn’t need to be.
Adjusting the arc is different for different types of heads.
Fixed pattern spray heads can’t have their arc adjusted on the head itself. The spray pattern is built into the nozzle. If you need a different pattern, you swap the nozzle for a different one. Nozzles are cheap and they twist on and off in seconds.
Adjustable pattern spray heads have a collar or ring you can turn to set the arc anywhere from about 0 to 360 degrees. Twist the collar until the spray covers the area you want and stops at the edge.
Rotor heads have left and right stop adjustments. You hold the head facing the direction you want it to start, then use the adjustment tool to set the right stop and the left stop. The head will rotate back and forth between those two points.
The goal in every case is to spray water on the lawn and only on the lawn. Not on the driveway, not on the fence, not on the sidewalk, not on the side of the house.
Step 4: Fix Heads That Aren’t Popping Up Right
Sometimes the issue isn’t the spray pattern. The head physically isn’t coming up out of the ground all the way. When that happens, the spray hits the surrounding grass and you get a wet spot right around the head with nothing past it.
Common causes:
- The head has sunk below grade (grass and soil are blocking it)
- Grass has grown over the top of the head
- Debris in the riser is preventing it from extending
- The head is broken inside
For sunk or buried heads, dig out around them carefully and reset them at the right height. For grass growing over the head, trim it back. For debris, you can sometimes flush it out by removing the nozzle and running the zone for ten seconds. For broken internal parts, the head needs to be replaced.
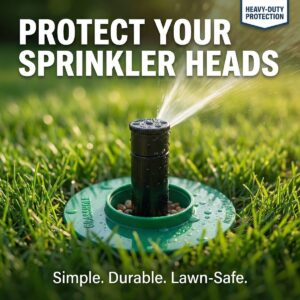
If you keep having this problem, the long-term fix is a physical barrier around each head that keeps grass from growing over it and keeps the head visible. A Sprinkler-Guard sits around the head at ground level and solves all three of those problems at once.
Step 5: Re-Test and Fine-Tune
After you’ve adjusted everything, run the whole zone for a full cycle and walk the yard while it’s running. You should see:
- Spray from each head reaching the next head over
- No water on hard surfaces (driveways, sidewalks, walls)
- No huge dry gaps between sprays
- Even coverage across the whole zone
If you see issues, go back and tweak. Coverage adjustment is iterative. Most homeowners need to walk through this two or three times before everything is dialed in.
Common Coverage Problems and Quick Fixes
Problem: One section of the lawn is always dry. The heads on either side of that section probably aren’t reaching it. Increase the throw on both. If they still don’t reach, you may need an additional head, which is a bigger project but worth it for consistent coverage.
Problem: Water keeps hitting the driveway. Decrease the throw distance on the head closest to the driveway, or adjust the spray arc so it doesn’t aim toward the driveway in the first place.
Problem: Some heads spray fine, others barely dribble. This is usually a pressure issue, not an adjustment issue. Could be a leak in the line, a clogged filter, or too many heads on one zone. Check for obvious wet spots (indicating a leak) before doing anything else.
Problem: The system covers everything except right around the heads themselves. Spray heads have a small “blind spot” right at the base. The fix is making sure the heads are spaced so the spray from one reaches the base of the next. Adjustment can usually compensate for moderate gaps.
Problem: Heads keep getting knocked out of adjustment. Mowers, trimmers, and foot traffic can physically rotate or damage heads, throwing off the adjustment. The fix is protection. A barrier around the head prevents impact and keeps the adjustment locked in.
Frequently Asked Questions
How do I adjust the spray distance on a sprinkler head?
Most pop-up spray heads have a small screw on top of the nozzle. Turn it clockwise to reduce the spray distance, counterclockwise to increase it. Make small adjustments and test the spray after each one.
How do I change the spray pattern from full circle to half circle?
For adjustable pattern heads, twist the collar or ring on the head to set the arc. For fixed pattern heads, you need to replace the nozzle with a different pattern (a half-circle nozzle for a half-circle spray, etc.).
Why is my sprinkler watering the sidewalk instead of the lawn?
The head is either oriented wrong, has the wrong spray arc, or is throwing water too far. Adjust the arc so it stops at the edge of the lawn, or reduce the throw distance until water no longer reaches the sidewalk.
How often should I adjust my sprinkler heads?
Check your coverage at least once a year, ideally at the start of spring. Heads can shift position over time from mower impact, foot traffic, and soil settling, so what was perfect last year may be off this year.
Can I adjust sprinkler heads while they’re running?
For rotor heads, yes. You can turn the head while it’s running to reset the start position. For spray heads, it’s safer to shut off the zone, make the adjustment, then turn it back on to test. You don’t want a screwdriver in your eye.
Want to stop fighting your sprinkler system every year? Grab our free guide, The Perfect Lawn: 12 Things You Need to Know to Achieve a Beautiful Lawn. Twelve practical lessons from people who’ve been there.
Related Articles
- Read more: fixing sprinklers that water the sidewalk
- Read more: the best time to water your lawn
- Read more: why a sprinkler head might not pop up
- Read more: protecting sprinkler heads from damage
Written by Ken Kwiatkowski, founder of Sprinkler-Guard and U.S. Army veteran. Protecting sprinkler systems since 2019.
Want More Tips Like This?
We put together a free guide called The Ultimate Perfect Lawn Guide that covers watering schedules, mowing heights by grass type, seasonal calendars, and the common mistakes that cost you money. No sales pitch, just practical stuff you can use this weekend.
Comment LAWN on our Facebook page to get your free copy.
Sprinkler-Guard. Made in the USA. Veteran-owned. Patented.